⚡ SAVE BIG on Xeno Digital Locks | Limited Stocks – Shop Now! | 🔒 Save $50 on Xeno X Gate Lock – Code X50 |
🚪 Save $15 on Door Bottom Seal – Code SEAL15 |
🛡️ Save $50 on Alexi Pro Lock – Code PRO50| FREE Mailbox Lock + Installation + Delivery Included in Every Xeno Bundle Deal |
⚡ JUNE LAUNDRY DEALS LIVE — Save $50 on Essential– Code XENO50 | Save $100 on Platinum– Code XENO100

How to Setup and Change the Master PIN Code on Your Xeno X-Gate Digital Lock
Your Xeno X-Gate digital lock is a powerful first line of defense for your home or office. At the heart of its security is the Master PIN Code. This isn’t just any code; it’s the administrative key that allows you to add, change, or delete other user PINs. If you’ve just installed your lock or feel it’s time to update your master code for security reasons, you’re in the right place.
This guide provides a clear, detailed, and easy-to-follow walkthrough of the entire process. Let’s get your lock configured precisely how you want it.
Understanding the Master PIN
Before we begin, it’s crucial to understand the role of the Master PIN:
- It’s the “Admin” Code: It grants you access to the lock’s programming settings.
- It’s Different from User PINs: User codes simply unlock the door. The Master PIN lets you manage those user codes.
- Default Code: Most Xeno X-Gate locks come with a default Master PIN, often 123456. Your first step should always be to change this default code to a unique, secure one.
What You’ll Need:
- Your Xeno X-Gate digital lock installed and powered (with good batteries).
- The current Master PIN. (If you haven’t changed it, use the default: 123456).
Step-by-Step Guide to Setting a New Master PIN
Follow these steps carefully. It’s best to do this with the door open to avoid accidentally locking yourself out during the process.
Step 1: Enter Programming Mode
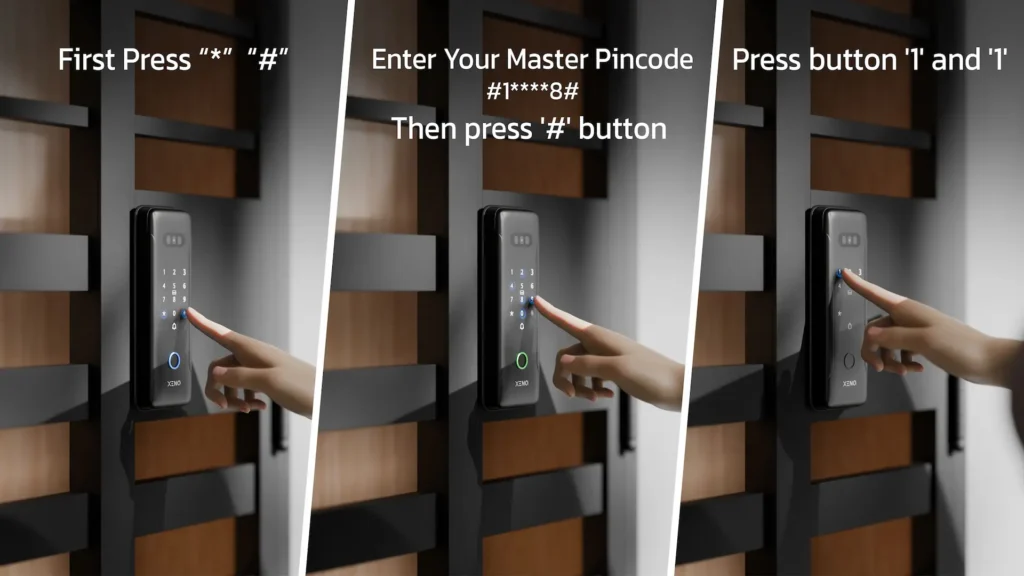
Locate the ‘#’ and ‘*’ buttons on your lock’s keypad. To initiate the programming sequence, press and release the ‘#’ button, followed immediately by the ‘*’ button.
On your keypad, you will press: “#” “*”
Step 2: Enter the Current Master PIN
After the beep, the lock is now waiting for authentication. Carefully enter your current 6-digit Master PIN.
- If you are using the lock for the first time, enter the default code: 123456.
After entering the digits, press the ‘#’ button to confirm and submit the code.
You will now enter: 1 2 3 4 5 6#
Step 3: Select the Master PIN Programming Option
The lock is now in its main admin menu. You need to tell it you want to change the Master PIN itself. Press the button ‘1’ (which typically corresponds to PIN-related settings), and then press ‘1’ again to specify the Master PIN.
Press: “1” “1”
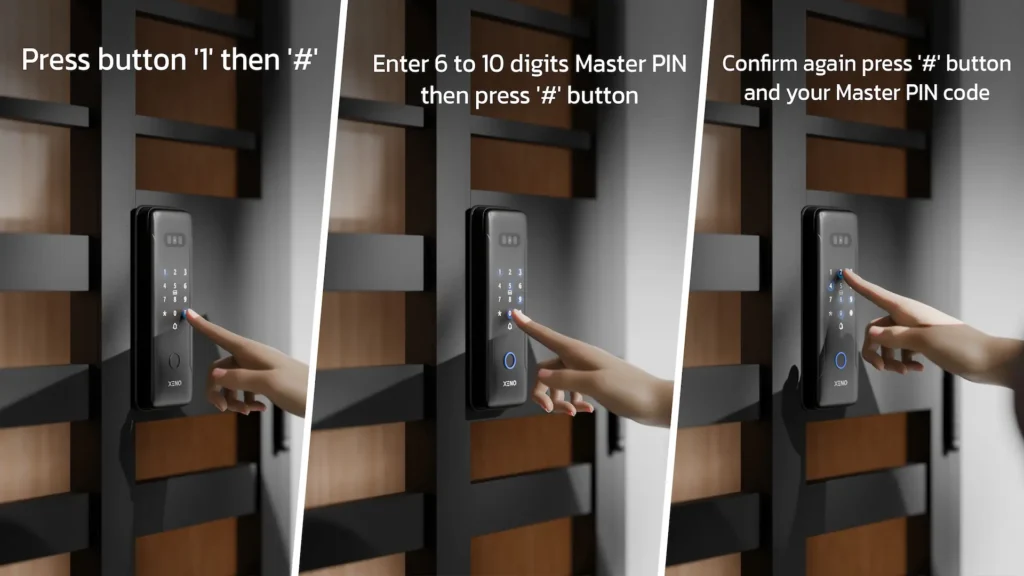
Step 4: Initiate the Change Command
You are now in the Master PIN management sub-menu. To command the lock that you wish to input a new code, press ‘1’ followed by the ‘#’ button to proceed to the entry step.
Press: “1” “#”
Step 5: Enter Your New Master PIN
The lock will now be ready to accept your new code. Enter your new, custom 6 to 10-digit PIN. Choose a code that is secure and memorable for you, but difficult for others to guess. Avoid simple sequences like 123456 or 000000.Once you have entered the new code, press ‘#’ to confirm your entry.
Enter your new code (e.g., 7 2 9 4 8 1) and then press #
Step 6: Confirm the New Master PIN
This is a critical step to prevent typos from locking you out. The lock will prompt you to enter the exact same code again. Re-enter your new Master PIN carefully and press ‘#’ a final time to set it.
Re-enter your new code (e.g., 7 2 9 4 8 1) and then press #
Step 7: Exit Programming Mode
You will likely hear a long, confirming beep indicating the new Master PIN has been successfully saved. To safely exit the programming mode, press the ‘*’ button. The lock will return to its standard standby state, ready for normal operation.
Press: *
Troubleshooting and Pro Tips
- Security First: Never share your Master PIN freely. Only give regular User PINs to family members or trusted guests.
- Battery Check: Ensure your lock’s batteries are not low. A dying battery can sometimes cause unpredictable behavior during programming.
Congratulations! You have successfully taken control of your Xeno X-Gate digital lock security by setting a strong, private Master PIN. This simple process is the most important step in personalizing and securing your digital lock system.